The Ultimate Oven and Range Cleaning Guide
The Ultimate Oven and Range Cleaning Guide
Whether you are a beginner chef or a gourmet culinary expert, some kitchen disasters are hard to prevent. And these cooking mishaps often accompany dreadful cleaning tasks. Among others, a dirty oven is a frequent occurrence that we all are very familiar with. If left unchecked, soiled ovens can lead to a hoard of problems. Reduced efficiency, altered food taste and bad smell are to name a few. Every time you cook something in a dirty, greasy oven, you are risking contamination of the food that you’re baking with remnants of food and greasy leftovers that cooked in it in the past. In addition to that, your oven will wear out faster. The greatest hazard a dirty oven can pose a fire risk. Often, grease can catch flames and cause problems when you attempt to put it down. At times, people leave their cooking food unattended while they're in different rooms of their house. Such instances majorly contribute to grimy oven interiors. The good news is, routinely cleaning your oven can prevent that from happening and assist it to perform better. Cleaning your oven regularly will not only help you to prevent safety and health problems, you'll also be rewarded with efficient working of your built-in wall ovens or range ovens in the long run, which goes without saying, are big investments.
How Do I Know It’s Time to Clean My Oven?
There are four indications when it is time for you to scrub your wall oven or range oven.
• The first is, its general appearance. If you notice residue or crust of old food, you should think about cleaning it as soon as possible.
• Second, a bad smell. When you heat it up, you might smell a distinct odour. If you do, it is a sign that there is lingering old food or dirt in there.
• Third, smoke. A clean and safe oven should not smoulder. You may want to bring out your cleaning gear if that happens.
• Lastly, if you feel that the overall efficiency of your oven has downgraded and it does not give results like it used to, cleaning it might prove to be very fruitful.
Why is Oven Cleaning an Important chore?
Cleaning your oven is often one of the tasks that is mostly dodged in the kitchen. We set the responsibility aside for many days, fearing scrubbing off grease and build-up of old food, and removing burnt pieces of food stuck in it. There are many reasons why you should not postpone doing so. The main reason why it is essential to clean the oven at regular intervals is that you don’t have to worry about safety and health risks, like a fire hazard, when cooking in a clean oven. Residual food in a dirty oven influences the taste of food that you cook in it and imparts a burnt flavor. Moreover, having a clean oven will ensure its longevity and better efficiency, your oven will last much longer if you take the time to clean it with regularity.
DIY Oven Cleaning Vs. Professional Oven Cleaning: What do I need?
You can clean your oven yourself, particularly when equipped with a lot of time and the correct products. Professional assistance might only be required in rare occasions – here are a few differences between DIY cleaning and getting professional help:
Cost - While professional help may cost you money, cleaning the oven yourself might save you some money. However, the certainty that the job is done correctly will come when professionals do it.
Deeper Cleaning- It is possible that you may only be able to clean the dirt that is visible on the surface, there can also be dirt hidden in the inner mechanism of the oven. In that case of extreme grime build-ups, it may be best to get professional help.
Professional Equipment–professionals would have the right set of tools and equipment for every stage of oven cleaning. Right from disassembling the parts to cleaning them to putting it back together. This might not essentially be the case if you pull your sleeves up and get down to doing it yourself. However, DIY cleaning is still better than avoiding the task altogether.
How to Clean Your Oven Yourself – A Comprehensive Guide
Things you’ll need:
• Store-bought Readymade Oven Cleaning Solution: You can use a store-bought oven cleaner. This makes it a very easy and fast process. It will help you remove serious build-ups of grease and grime.
• Homemade Cleaner: You can also use homemade cleaners to do the job. A paste of baking soda, water and vinegar will work if you have a lot of build-up. For a mildly dirty oven, you can work with lemon and water too.
• Rubber cleaning gloves: If you are using an oven cleaner, do not use disposable gloves at any cost. This is very essential as you will need a thicker barrier between the readymade cleaner and your skin.
• Protective safety glasses: You will need safety glasses to guard your eyes from what the chemical cleaner might emit on contact with the grease.
• Old newspapers or paper towels: To cover the floor around the oven, in case the cleaner drips on the floor.
• Damp cloth rags: Once the cleaner has been applied, you will need damp rags to clean up the grease and grime.
• Scouring pumice (optional): You might need these if you are dealing with a lot of stubborn build-up.
• Large plastic garbage bags: You’ll need these when you clean your oven racks.
Step-by-Step Guide to cleaning a soiled Oven with Cleaning Solutions
1. Firstly, remove everything from your oven that is not permanently connected to it - racks, pizza stone, thermometer, etc.
2. Spread newspapers or paper towels on the floor around your oven.
3. You may either use a store-bought solution or homemade solution. Make sure to wear gloves and safety glasses in case of a store-bought solution.
4. Spray the oven cleaner on the inside of your oven, covering all the walls and crevices. In case of an electric oven, don't spray on the heating components; instead, simply lift them up and spray underneath them. If you are cleaning a gas oven, don't spray the cleaner where the gas comes through. Close the oven door when you're done.
5. A convection oven as opposed to a conventional one might require an additional step here. For cleaning the fan, you’ll have to unscrew the netted cover, carefully unscrew the fan blade nut and remove the fan, brush away the loose dirt and immerse the whole thing in cleaning solution for about and hour. Wipe the fan blades dry with a damp rag after.
6. Let the cleaner sit for the time listed the label of its container. Most ready made cleaners need 20-30 minutes to do the job. It varies in the case of homemade solutions. A paste of baking soda, water and vinegar will need to sit 10-12 hours.
7. In the meantime, take your oven racks and spray them with the cleaner. Place them in plastic garbage bags, tie a knot at the top and leave them for about 20 minutes.
8. Once the given amount of time has passed, take a wet cloth rag, open the oven and wipe down all surfaces. Be sure to really wipe every corner and crevice so that you aren’t leaving any dirt or cleaner in it.
9. Rinse the racks with hot, soapy water. You can use a pumice on any burnt crusts stuck on them. Dry them and place them back in the oven.
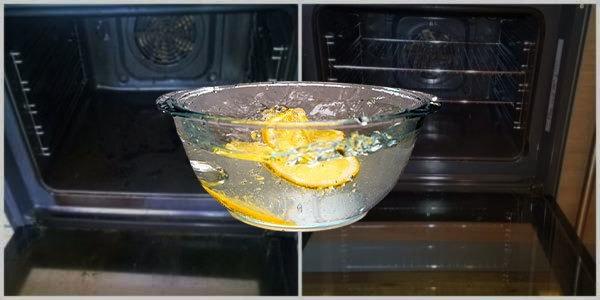
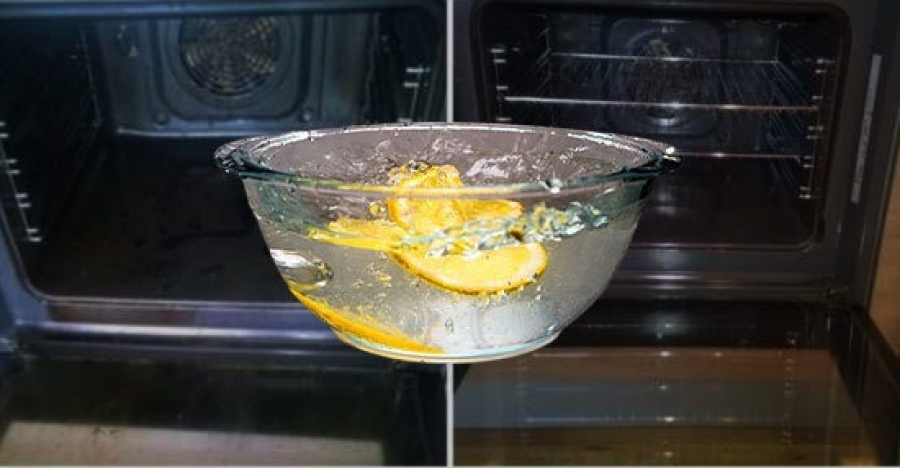
Cleaning an Oven with Lemons
Lemons to clean ovens are used only when it is only mildly grimy. Here is a step-by-step method:
1. Cut two lemons in half and place them in a medium sized oven proof bowl filled with water.
2. Set your oven’s temperature to 250 degrees.
3. Once it is heated, place the bowl of water and lemon inside the oven and leave it for one hour.
4. Turn off the oven after an hour, open the door and let it cool for a while.
5. The oven should be warm but cool enough so you don’t burn yourself on touching the surfaces. Take a damp rag and wipe down all the walls and corners of the oven and the door.
6. In case of extra sticky spots, you might want to use a pumice or an abrasive tool to remove stubborn pieces of dirt.
7. Be sure to thoroughly wipe all parts, you don’t want to leave any grease or grime behind.
Do self-cleaning Ovens need manual cleaning too?
Yes, self-cleaning ovens need manual cleaning too. Sometimes, it is possible for these ovens to burn out their fuses, or destroy their circuit boards because of overheating as some of the heatingcomponents. The temperature of a self-cleaning oven might get up to a 900℉, which is enough to melt lead, tin and zinc. These issues of overheating might lead to other dangerous situations or a potential fire hazard. This is the reason why you may want to learn how clean these ovens yourself. Youcan use ammonia, citrus, and baking soda to clean all the dirt and gunk stuck in a self-clean oven. Just make sure it does not contact the heating elements.
Conclusion
Cleaning your oven might be a hectic task, you may often find yourself postponing the job because of the efforts and time it requires. If not yourself, you should get professional help to do it for you. The more you delay it, the more dirt and grease will start settling in your oven and it will pose as a bigger danger in the long run. If you want your food to taste not burnt or smelly, there is a simple solution, clean your oven. If you don’t want a fire hazard happening in your home, again, clean your oven. It is better to have a healthy and clean oven than delaying some manual work at the cost of your health and safety.