Banana Energy Bars

About this Recipe
When you are hungry for a snack, a handy banana energy bar like this is going to fill that little gap and give you a little boost of energy. Great for kids snack in a lunch box, or that coffee break nibble in the morning, this very satisfying bar.
These bars are appropriately named because of their ingredients. Did you know that bananas are considered one of the best energy foods. Their properties of carbohydrates, potassium and B6 are all helpful in boosting energy. So long as you use dark chocolate, (which is lower sugar than a milk or light chocolate) it also boosts your energy level. Oatmeal, which is the choice in granola bars and many energy bars, is absorbed at a slower rate by our metabolism, and its properties work to help our bodies metabolize energy.
Grandmother's Tips for Banana Energy Bars Recipe:
1. Use a good dark chocolate at least 70% or higher to get the health benefits from chocolate.
2. Although we did the entire recipe with an electric stand up mixer, if you don't have one, you can always just mash the bananas with a potato masher, and stir the ingredients together by hand. Stir the dry ingredients together before combining with wet ingredients.
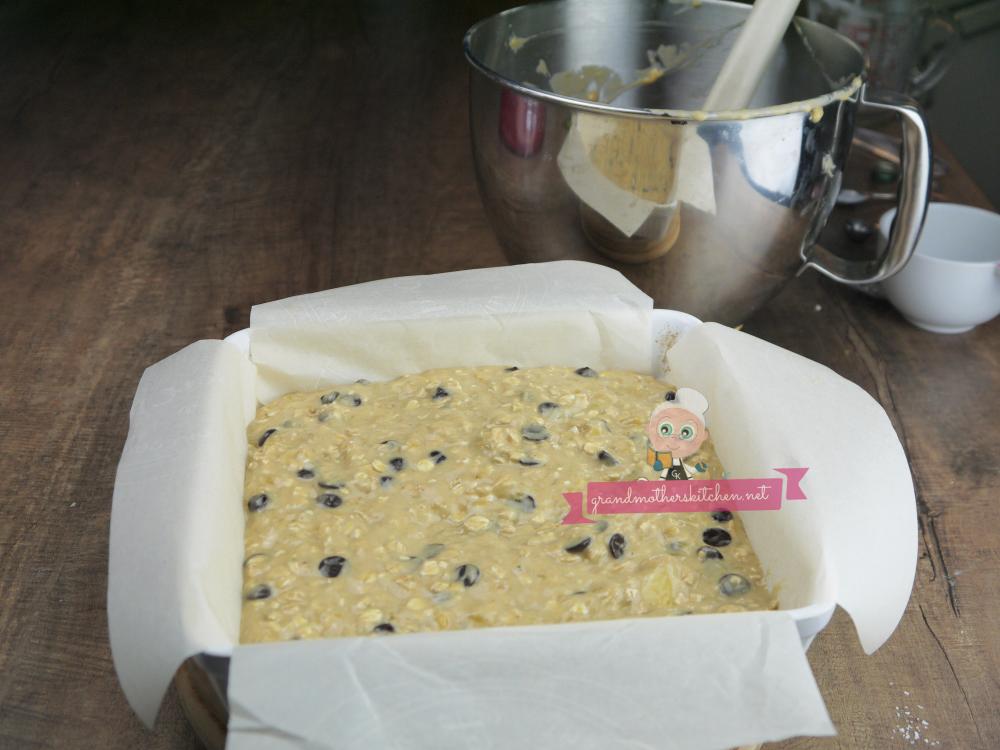
3. Using the parchment paper makes removal from the baking dish very easy.
4. To keep fresh long, refrigerate the banana energy bars. Another option is to freeze the bars in a sealed container and just take from the freezer as you need.
5. This makes these banana energy bars a good choice to bake to add to lunches or to snack on if you are doing some sports.
Ingredients
Makes 9x9 inch square cut into 12 pieces
2 bananas, medium to large in size
1/4 cup grapeseed oil (or coconut oil)
1/4 cup brown sugar, packed
1 egg
1 teaspoon pure vanilla extract
1 cup all purpose flour
1/2 teaspoon salt
1/2 teaspoon baking soda
1 cup old fashioned oats
1/2 cup dark chocolate chips, (at least 70% so you get the good positive value from the chocolate) *Optional
1 ounce chocolate, melted to drizzle *Optional
Directions
Preheat the oven to 350 degrees F.
1. Line a 9x9 baking dish with parchment paper. Cut two pieces to fit, one in each direction leaving overhang edges for easy removal of the bars when they are baked and cooled. Grease with a small amount of oil.
1. Have ready the mixer.
2. Cut the bananas into small 1/2 inch rounds. Put into the mixer and beat on low speed until they are mushy.
3. Add the oil and brown sugar, beat in for 2 minutes.
4. Add the egg and beat until well combined. Add the vanilla and mix in.
5. In a small container, stir the flour, salt and baking soda together with a fork to combine. Add the oats, stir into the other dry ingredients.
6. Stop the mixer, add all the dry ingredients at the same time. Turn the mixer back on and mix until well combined.
7. Add the chocolate chips and mix in.
8. Transfer to the prepared baking dish, use a spatula to even out the top and move the chocolate chips around if there are clumps of chocolate chips.
9. Place into the preheated oven and bake for 20-22 minutes or until browned around the edges and not jiggling in the center.
10.The banana breakfast bars are baked at this point, but we like a browned top, so we turned the oven to broil, transferred the banana bars to the top rack and let broil for just a few minutes. NEVER walk away from things you are broiling. It happens quickly and you can go from having a beautiful baked item to a terrible burnt black on the top. When you are satisfied with the color, remove from the oven to cool. Leave in the pan until the banana breakfast bars are at room temperature.
11. Lift out the parchment paper and bars, Place onto a cutting board and cut into squares.
12. If you decide to drizzle chocolate, melt the chocolate in a chocolate melting pot or double boiler over low heat. Once melted just use a teaspoon to drizzle a little on each banana energy bar.
Enjoy!
Return to this Banana Energy Bars recipe or check out more recipes at Grandmother's Kitchen
Some interesting things about flour. There are some very old cookbooks that tell you to sift flour before measuring it. Flour millers now produced flours that never have to be sifted before it is measured. When you do measure flour, choose the type of measuring cup that you can fill the cup to the top, rather than the glass measuring cups that have another half inch or so on top of the measure line. You can't get a 100 percent accurate measurement with that type of cup. Rather use the style of measuring cup that is exact. Fill the flour to overflowing directly from the flour package. Don't bang the flour down to compress. Once it is overflowing, use a knife or spatula to level out the top.
For cakes, if they ask for sifting, now is the time, after the measuring to put int the sifter or fine strainer. Sift it onto parchment paper or some other type of surface that is easy for you to transfer into the mixing bowl. Any other dry ingredients like baking powder, salt or soda should also be sifted with the flour. For some recipes like an angle cake, you may be asked to sift the flour 3 or 4 times.
We used an all purpose flour in this recipe. Regular or all purpose or unbleached flours are most commonly used in baking. If you see a recipe and they call for flour without specifying a certain type, use all purpose flour. Most pastry, cakes, breads, cookies and sauces will use all purpose flour.
Some other flours such as wholewheat is flour that is milled directly from the whole wheat grain. It is a coarse flour. It is not refined or bleached. Bakers like to use it in quick breads and muffins. Sometimes doing a half and half proportion of whole wheat and all purpose is preferred so the finished baked product is not quite so heavy and dense as when done with only whole wheat flour.
References: Grand Diplome Cooking Course (1972, Hardcover), William Anne. Danbury Press.